Table of Contents
To size an LED power supply correctly, start with the maximum electrical load, not with a guessed supply wattage.
For a constant-voltage LED system, use this sequence:
Confirm voltage → calculate total LED wattage → calculate current → check loading guidance → apply derating → evaluate voltage drop → select a suitable rated supply
For an LED strip:
LED load (W) = Strip wattage per unit length × Total powered length
But the calculated load is only the first number in the sizing process.
A 90 W LED load does not automatically mean that every 100 W power supply is suitable. Usable output can change with ambient temperature, input voltage and installation conditions.
This page owns the sizing and wattage-calculation search intent. For the broader selection workflow—including AC input, dimming, certification, environment and physical dimensions—use How to Choose an LED Power Supply. For the overall topic framework, return to the LED Power Supply Guide.
Step 1: Confirm the Load Is Constant Voltage
Before calculating watts, confirm that the LED load actually requires a constant-voltage supply.
Common constant-voltage applications include many:
- LED strips;
- LED tape products;
- signage modules;
- architectural linear-lighting systems.
The exact voltage must come from the load documentation.
The current IEC safety standard for electronic LED controlgear is IEC 61347-2-13:2024. It provides the current international controlgear safety framework for LED light sources: IEC 61347-2-13:2024 — LED controlgear safety requirements.
Do not apply constant-voltage sizing logic to a constant-current load without confirming the required electrical architecture.
Step 2: Find the Maximum Power Consumption
Use the LED manufacturer’s specified maximum consumption wherever possible.
It may be listed as:
- watts per foot;
- watts per meter;
- watts per module;
- watts per fixture;
- total watts;
- current at a specified voltage.
LED strip calculation
If the strip is rated in watts per foot:
Total load = W/ft × Total feet
If it is rated in watts per meter:
Total load = W/m × Total meters
Example:
- strip power: 4 W/ft
- powered length: 20 ft
4 W/ft × 20 ft = 80 W
The calculated connected load is 80 W.
LED module calculation
If a sign contains 60 modules rated at 0.72 W each:
60 × 0.72 W = 43.2 W
The calculated module load is 43.2 W.
Multiple branches
If one supply powers:
- Branch A = 25 W
- Branch B = 30 W
- Branch C = 18 W
then:
25 + 30 + 18 = 73 W
The supply must be evaluated against the 73 W combined maximum load, not merely the largest individual branch.
Step 3: Calculate the Required Current
For a DC constant-voltage load:
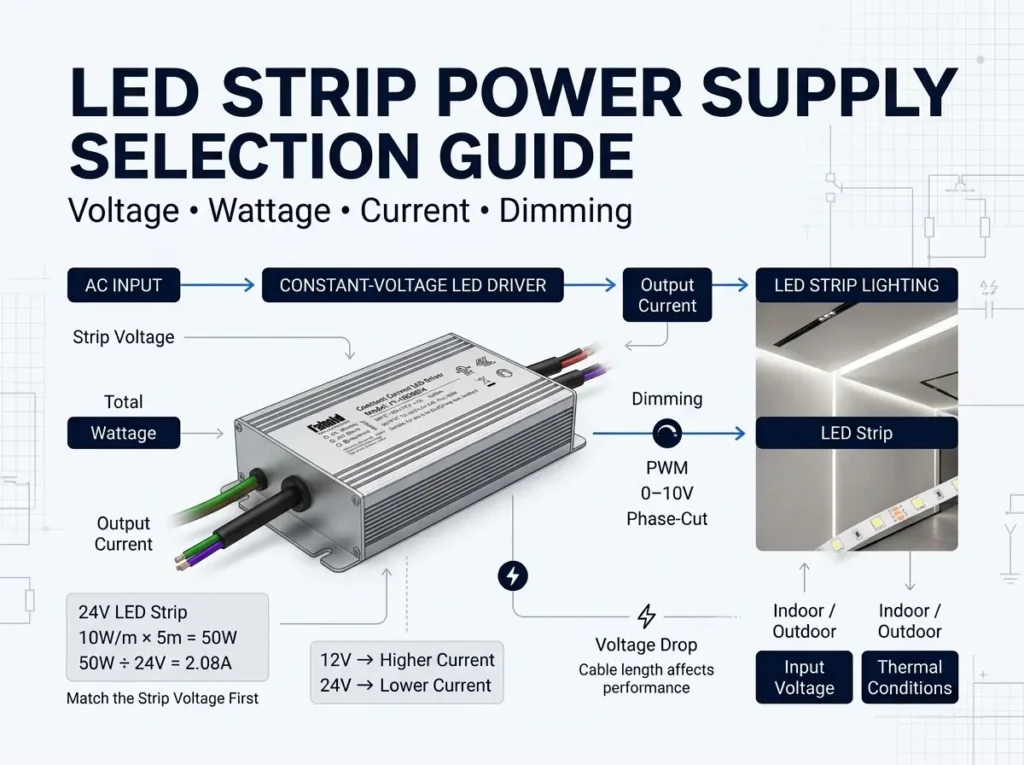
Current (A) = Power (W) ÷ Voltage (V)
Example: 24 V, 96 W
96 W ÷ 24 V = 4 A
Same wattage at 12 V
96 W ÷ 12 V = 8 A
The wattage is identical, but the 12 V system draws twice the current.
That difference matters because conductor loss and voltage drop become more significant as current rises for the same resistance.
If you are still deciding which system voltage to use, continue with 12V vs 24V LED Power Supply: How to Choose. Where 48 V distribution is being evaluated, see 24V vs 48V LED Power Supply: Key Differences.
Step 4: Separate LED Load Wattage From Power-Supply Rating
The LED load calculation tells you what the connected LEDs require.
The power-supply rating tells you what the supply is designed to deliver under specified conditions.
They are related, but they are not automatically the same number.
For example:
Calculated LED load = 80 W
This tells you that a 60 W supply is insufficient for that stated load.
It does not yet prove whether an 80 W, 90 W, 100 W or another nominal rating is the correct final choice.
You still need to check:
- rated output;
- allowable continuous loading;
- temperature derating;
- input-voltage derating where applicable;
- cooling and mounting conditions;
- other manufacturer restrictions.
Step 5: Use Headroom as Engineering Margin, Not a Universal Rule
A fixed “add 20%” recommendation appears frequently in LED-lighting discussions.
It can be a practical preliminary screening approach, but it should not be presented as a universal code rule.
The more defensible requirement is:
Usable supply capacity under actual operating conditions ≥ Maximum connected LED load
MEAN WELL’s LED power-supply guidance specifically discusses adding margin to actual power usage and shows the relationship among output load, operating temperature and life, while also emphasizing temperature derating: MEAN WELL — LED power-supply margin and derating guidance.
Therefore, the correct process is:
- calculate the LED load;
- establish reasonable preliminary margin;
- open the exact candidate datasheet;
- check its derating curves and loading restrictions;
- select the standard rating that still supports the load under actual conditions.
If the question is specifically whether using a much larger nominal rating is acceptable, do not expand this sizing page into that separate intent. Continue with Can You Use a Higher-Wattage LED Power Supply?.
Step 6: Apply Temperature Derating
This is one of the most important checks after the basic load calculation.
A supply marked “100 W” may not necessarily provide 100 W continuously across its entire operating-temperature range.
Many power supplies publish a derating curve showing how allowable output changes with ambient temperature.
Example concept
Assume:
- LED load = 80 W
- supply nameplate = 100 W
- usable output at actual ambient = 80% of rating
Then:
100 W × 0.80 = 80 W usable output
In this hypothetical condition, the apparent 20 W nameplate margin has disappeared.
This is why the sizing workflow should be:
Load calculation first → thermal check second → final rating approval third
not simply:
Load × 1.2 → buy the next size
High-temperature locations to watch
Pay particular attention to:
- sealed sign cabinets;
- exterior boxes heated by sunlight;
- ceiling voids;
- compact architectural housings;
- enclosed equipment compartments;
- industrial spaces with elevated ambient temperature.
The temperature around the power supply can be materially different from the room or outdoor air temperature.
Step 7: Check Input-Voltage Derating Where the Datasheet Requires It
Temperature is not the only condition that can affect usable output.
Some power-supply datasheets also provide an output-load curve versus AC input voltage.
That means a product can technically accept a low-end input voltage while not necessarily providing the same full output capability at every point in the range.
Do not infer full output solely from the statement that the input voltage is “within range.”
The exact datasheet determines the usable capacity.
Step 8: Calculate Combined Demand for Multiple Loads
If one constant-voltage supply serves multiple compatible loads, add their maximum demand.
Example:
| Load | Maximum power |
|---|---|
| Linear run A | 36 W |
| Linear run B | 24 W |
| Accent run C | 18 W |
| Total | 78 W |
The supply sees a maximum connected load of:
36 + 24 + 18 = 78 W
Then apply the same sizing sequence:
78 W load → current calculation → loading guidance → derating → final supply rating
For sign lighting, also consider distribution layout, branch wiring, service access and enclosure temperature instead of treating total wattage as the only design variable.
Step 9: Treat Voltage Drop as a Distribution Problem
A higher-wattage power supply does not automatically solve voltage drop.
Voltage drop depends on factors such as:
- current;
- conductor resistance;
- conductor length;
- conductor size;
- connection quality.
For the same power, lower system voltage means higher current. This is one reason conductor design becomes especially important in long low-voltage runs.
Southwire’s professional voltage-drop calculator models voltage drop using circuit voltage, load, conductor size and run length, illustrating why conductor design has to be evaluated separately from power-supply wattage: Southwire Voltage Drop Calculator.
For an LED-strip project, review the wiring layout together with LED Strip Lighting instead of assuming that adding supply wattage will compensate for a poor low-voltage distribution design.
Step 10: Size for the Maximum Commanded Load
If a dimmable lighting system normally operates at 50% brightness, do not automatically size the supply at half the connected full-output load.
Unless the LED-system manufacturer provides a different approved method, the power supply should be evaluated against the maximum load the system can command.
Reasons include:
- the control schedule can change;
- commissioning may use full output;
- a scene can command all loads simultaneously;
- controller behavior can change during troubleshooting or reprogramming.
Dimming compatibility is a separate selection issue and should be checked using the broader How to Choose an LED Power Supply workflow.
Complete LED Power Supply Sizing Example
Consider a constant-voltage architectural LED-strip installation.
Known load data
- load type: constant voltage
- strip voltage: 24 VDC
- strip consumption: 5 W/ft
- powered length: 16 ft
Step 1 — Calculate load wattage
5 W/ft × 16 ft = 80 W
Maximum connected load:
80 W
Step 2 — Calculate current
80 W ÷ 24 V = 3.33 A
Nominal load current:
≈ 3.33 A
Step 3 — Establish the electrical minimum
The supply must provide:
- compatible 24 VDC output;
- usable output capacity sufficient for the 80 W maximum load;
- adequate current capability;
- compliance with the candidate’s loading and derating requirements.
Step 4 — Check the candidate datasheet
Now verify:
- rated output wattage;
- rated output current;
- ambient-temperature derating;
- input-voltage derating;
- mounting/cooling requirements.
Only after those checks should the final nominal power-supply rating be approved.
Notice what this example does not do:
It does not automatically declare a specific 100 W product correct just because 100 W exceeds 80 W.
Quick Sizing Table
| Known value | Calculation / action |
|---|---|
| W/ft + length | W/ft × ft |
| W/m + length | W/m × m |
| W/module + quantity | W/module × modules |
| Several branches | Add maximum branch loads |
| Watts + voltage | A = W ÷ V |
| Calculated load | Compare with usable supply capacity |
| High ambient | Check temperature derating |
| Low AC input | Check input-voltage derating if published |
| Long wire run | Evaluate voltage drop separately |
Why Blindly Adding 20% Can Fail
Consider two installations with the same 80 W connected load.
Installation A
- climate-controlled interior;
- adequate ventilation;
- supply operates within its full-output thermal region.
Installation B
- enclosed exterior sign;
- elevated internal temperature;
- restricted airflow.
A simple calculation:
80 W × 1.2 = 96 W
followed by “therefore use any 100 W supply” ignores the different thermal conditions.
The correct sequence is:
Calculate load → establish margin → check ambient/enclosure → apply candidate derating → approve rating
This is more defensible than converting an engineering rule of thumb into a universal requirement.
Does a Higher-Wattage Supply Force More Power Into the LEDs?
For a compatible constant-voltage system, the power-supply wattage rating represents available capacity, not a command that forces the LED load to consume that full wattage.
A compatible 40 W LED load connected to a higher-capacity supply does not automatically consume the supply’s complete nameplate power.
However, that does not mean unlimited oversizing is always the best design decision.
Large oversizing can affect:
- cost;
- physical size;
- operating efficiency at the chosen load point;
- dimming behavior;
- minimum-load restrictions where applicable;
- overall system architecture.
That topic is intentionally separated into Can You Use a Higher-Wattage LED Power Supply? to prevent keyword and search-intent overlap.
North American Low-Voltage Lighting Context
For North American projects, sizing is only one part of system approval.
UL 2108 addresses low-voltage lighting systems, and UL’s technical guidance discusses low-voltage luminaires and Class 2 power-unit configurations: UL Solutions — UL 2108 Low-Voltage Lighting Systems.
Do not infer a Class 2 claim from voltage or wattage alone. Verify the actual product certification and the project’s installation requirements.
LED Power Supply Sizing Checklist
Before approving the wattage:
- Confirm constant voltage versus constant current.
- Verify required DC voltage.
- Use maximum load data from the LED manufacturer.
- Add all loads sharing the supply.
- Calculate current using I = P ÷ V.
- Do not rely on a generic margin rule alone.
- Check allowable continuous loading.
- Check temperature derating.
- Check input-voltage derating where specified.
- Evaluate voltage drop separately.
- Size for maximum commanded load.
- Complete the remaining control, environmental, compliance and mechanical checks.
FAQ
What size LED power supply do I need?
Calculate the maximum connected LED load, match the required output voltage, and select a supply with sufficient usable capacity after checking the candidate’s loading guidance and derating conditions.
How do I calculate LED power-supply wattage?
For strips, multiply watts per foot or meter by total powered length. For modules, multiply watts per module by quantity. Add all loads that share the same supply.
Should I always add 20%?
No universal 20% rule replaces the datasheet. Additional engineering margin can be useful, but final capacity should be verified against the candidate supply’s loading and derating requirements.
Can I use a 100 W supply for an 80 W LED load?
Possibly, but wattage alone does not confirm compatibility. Verify voltage, current capability, derating, dimming, environment, certification and installation constraints.
How many amps does the power supply need?
For a constant-voltage load, use I = P ÷ V. An 80 W load at 24 V is approximately 3.33 A at the stated rated condition.
Does temperature affect power-supply sizing?
Yes, when the candidate manufacturer specifies output derating with ambient temperature. Use the exact product’s derating curve rather than assuming full nameplate output at every temperature.
Does voltage drop mean I need a larger-wattage supply?
Not necessarily. Voltage drop is primarily a conductor and distribution issue. Evaluate current, conductor size, length and resistance separately.
Need Help With Your LED Power Supply Project?
Tell us what you are working on. We will review your application and recommend the most relevant FAHOLD solution.